It's been a busy past few weeks, which means not as much time to paint. I'm still not finished with this 1,500 point ork army, but I was able to paint up two Deffkoptas over the weekend. I wanted them to match the Trukk, so I used the same military green color, but added some rust pigments and gave them a little character by adding the kill tally to one, and the flame design to the other; that gave me a good chuckle. Anyway, here's a few pics of the process. I'm also working on a squad of Nobz. Those dudes are badass on the gaming table.
Sunday, December 9, 2012
Thursday, November 22, 2012
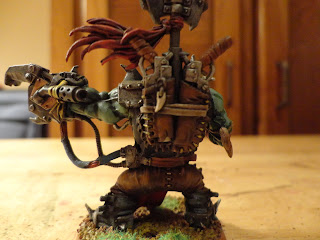
Ork Warboss
A lot of blood and sweat went into this one, but I think he came out pretty well. He's a culmination of all the painting techniques I've learned so far. I tried to highlight interesting areas--especially the red cloth and green flesh. I can finally see the slow, gradual improvements in my painting. I can also see areas that I still need to work on.
Waaaaaaagh!!
The highlighting on the skin and cloth
Leather hoslters
Saturday, November 17, 2012
Finished Trukk (Finally!), Killa Kan, and Nob
I'm really happy with the final turnout of the Trukk. The machine gunner and driver have been completed, and I also found a great paint for blood effects: Tamiya X27 Clear Red Acrylic Paint. Some areas mixed with brown and/or black paint (for oxidized blood), and other areas painted with pure clear red (for fresh blood) makes for a more realistic blood splatter.
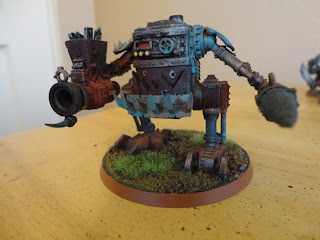
For the Killa Kan, I just drybrushed the whole model (after priming it black) with Leadbelcher, and then highlighted some areas by drybrushing them a brighter silver. After that, I used my trusty brown and red rust pigments, followed by generous washes of Agrax Earthshade (brown), Nul Oil (black)l, and Biel-Tan Green to taste.
Lastly, for the Nob, I undercoated him with white, did a wash of Biel-Tan Green on the skin, painted the clothing with a 50/50 mix of Abbadon Black and Nul Oil. I used Leadbelcher for the armor and weapons, and a mix of Wazdakka Red and Nul Oil for the straps, and finally, Dwarf Bronze for the bullets and small bits of the Power Klaw. After that, I washed the entire model with Agrax Earthshade, except for the weapons which I washed with Nul Oil. Pretty simple, but I gotta bang these guys out if I wanna start playing.
This guy's ready to rock n' roll
The trukk don't stop fer nuffin'
Dakka
The final product
Walking pile of rust with a scorcha'
This Nob's gonna lead a mob of 30 boyz into battle
Tuesday, November 13, 2012
Trukk!!
Yeah, yeah, I know I just posted about my unfinished ork truckk yesterday, but this is my blog, and I can do whatever the %&@* I wanna do. I added some paint chippings, fixed up the blood/rust on the front ummm... "impailer" and did some tweaks here and there. Pretty darn happy with it. Vroom vroom, baby.
dere mud
I know I still haven't finished the driver and the machine gunner, but I'll have those up within the next few days I'm hoping.
Monday, November 12, 2012
Weekend Update
What better way to spend the long weekend ( a sincere "thank you" to all our American veterans) than paint miniatures? Oh, that's an easy one: Drink beer and act obnoxious. Amidst my busy weekend schedule, I somehow managed to find time to paint. I got half of the auxilia in the can for my DBA Early Imperial Roman army, and I'm nearly finished with a trukk for my Warhammer 40k orks. I had a grand time experimenting with different techniques and colors on this one. I asked myself: "What if a WWII Sherman tank and a garbage bin got drunk in a bar, and then staggered home together? What would their lovechild look like?" Well, this is what my twisted imagination came up with...
It just needs a few more touch-ups, and I still need to paint the
driver and machine gunner. (Saving the best for last).
a smidgen of yellow paint gives an interesting mud effect.
That's it. Next on the agenda: Finish up the trukk, and start working on the Roman
cavalry. Giddyup.
Monday, November 5, 2012
Roman Legio is Done!
From The Armies and Enemies of Imperial Rome by Phil Barker:
"The backbone of the Roman army throughout its varied history was the Legio, a large body of drilled infantry mainly or at times entirely trained for close combat. Its men differed from the close combat infantry of such other nations such as the Greeks, Carthaginians, or Macedonians in that their primary weapon was not a long spear or longer pike retained in the hand to thrust, but instead a combination of hand hurled missles and sword...the missle weapon was the Pilum, a heavy short ranged weapon hurled just before contact..."
After researching a bit about my Early Imperial Roman army (25 BC-197 AD), I decided two things: That I would paint my Roman Legio (Latin for military levy, or "legion") like the two imposing men in the picture above, and that there was absolutely no way I would be able to create that level of detail on their shields; 15mm is just too dang small, and my brush technique is not at that level yet. I decided that I would be happy with a red shield with a bronze border and some yellow lines, letting the imagination fill out the rest of the details. After all, these figures will be used on the gaming table, seen from a distance-- not in a museum display case. Now that they are done, I will more than likely work on the Auxilia portion of the army next. So, without further adieu, here is a bit of the process of getting these guys done.
After priming them all with Chaos Black, I painted in a row all their flesh, then red clothing and shields, followed by armor, and finally fine details such as sandals, bronze outlines, small leather straps, and pilums.
Here's the shield design I was talking about. You get the idea.
I cut some sheet styrene to 15mm standards (15mm x 40mm),
primed it black, then slapped on some green paint, static grass,
and little bits of gravel.
The finished product.
Sunday, November 4, 2012
The Gateway Has Opened...
I have recently discovered the joys and frustrations of miniature painting. Only a few short months ago I was shown by a very talented friend how to properly paint an orc. What I had proudly presented to him was merely a blob of green, and he was unable to resist the urge to laugh at my feeble attempt. He then showed me how to transform the lackluster monstrous humanoid into a truly intimidating creature through the simple yet elegant techniques of dry brushing, washing, and highlighting. The little (now several shades of) green fellow jumped off the table and proceeded to swing his battleaxe at me with reckless abandon-- well, not really, but he did look pretty darn realistic. I've been hooked on painting minis ever since. The next day I went down to my friendly --not so much, actually-- gaming supply store, and blew my whole paycheck. I've got minis, paints, washes, brushes, a hobby knife, primers, static grass, and a few other things in my ever growing tool box. Join me on my journey of painting whatever little figures I can get my grubby hands on. I plan on posting tutorials of some basic painting techniques, to show progress of my painting ability over time, and the armies that I am working on. Currently, I have somehow convinced myself to paint two armies at the same time. I'm working on a 1,500 point Ork army for Warhammer 40k, as well as an Early Imperial Roman army for De Bellis Antiquitatis (better known as DBA). I know what you're thinking: "Have you lost your mind? Are you nuts? Two armies at the same time?!" For clarification, yes, I have lost my mind. Hopefully, this blog will inspire me to get these armies on the table sooner rather than later. In the meantime, I will leave you with a few pictures of what I have finished so far, and what's on the painting table at the moment.
Coming Soon: Step by step process on how to paint a Killa Kan, or as I like to call them: "a walking rusty bucket that shoots scraps of metal at Space Marines" WAAAAGH!!!!
Some Boyz, Nobz, and a Killa Kan
Closeup of my Killa Kan
15mm Early Imperial Romans compared to an Ork Boy
Assembly line painting gets the job done faster
Coming Soon: Step by step process on how to paint a Killa Kan, or as I like to call them: "a walking rusty bucket that shoots scraps of metal at Space Marines" WAAAAGH!!!!
My dwarf, "Flanigan Redbeard"
Closeup of my Killa Kan
15mm Early Imperial Romans compared to an Ork Boy
Assembly line painting gets the job done faster
Halfway done with the Legion
Subscribe to:
Posts (Atom)


